")
Add 808 Bass to Any Kick or Drum Loop
Want to create hard-hitting 808s in Ableton Live? This tutorial covers multiple techniques — from adding sub bass to drum loops, through to synthesising 808s from scratch.
What is an 808, Really?
Before diving into modern production techniques, let’s clarify what we mean by “808.” The term originates from Roland’s TR-808 drum machine, released in 1980, and any sound from that legendary box can technically be called an “808” – kicks, snares, hi-hats, cowbell and more. However, in today’s production landscape, the term “808” has evolved to specifically refer to those deep, tonal bass kicks that dominate trap, hip-hop, drill, and countless other genres.
Adding 808 Bass to Any Kick, Drum Kit or Drum Loop
It’s never been easier to add subs to a kick sound or drum loop.
Let’s look at the basic version, then an enhanced version…
Drum Buss
The Drum Buss audio effect is a modern classic.
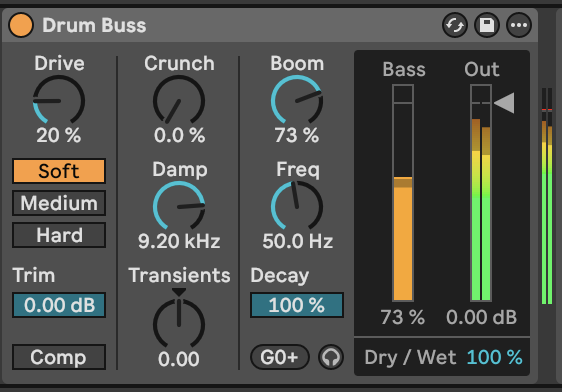
And it’s simple to use:
- Drop it on any track that’s playing a drum loop
- Turn up the Boom volume
- Tune the boom’s pitch using the Freq dial
- Set the length of the boom using the Decay slider
You’ll now hear a sub bass under every kick drum in your loop.
However… there’s some limitations to be aware of:
- The Freq dial doesn’t automatically lock to exact musical pitches, so you’ll need to hit the little button under the Decay slider to get your sub to match the key of your song. In the screenshot above its showing G0+ and that “+” symbol is telling us the pitch is close to the note “G” but not exact, so it’s out of tune. Hitting that button will set it to a perfect “G” note.
- The distortion controls – drive and crunch – have more impact on the other drum sounds in your loop, and not so much on the actual sub itself. This limits its ability to create tonal 808s that can be used as a bassline. If you’re using a Drum Rack there’s a workaround, which is to put the Drum Buss device on the Kick pad in the Drum Rack, and not on the whole kit.
To overcome these limitations, we created an Ableton audio effects rack (more on that later). Next, let’s look at creating 808s from scratch.
Creating 808s from Scratch with Operator
So far we have looked at how to add sub bass to any kick or drum loop – but there is another way to create 808’s which is to synthesise it.
The foundation of any great 808 starts with understanding synthesis fundamentals. Ableton’s Operator provides a straight-forward path to an 808 bass sound.
Building Your Base (bass?) 808
Start with a simple waveform:
- Want your 808 to be smooth and subby? A sine wave provides the cleanest foundation.
- Want your 808 to be a kick that cuts-through a mix, or to act more like a bassline? A triangle wave can provide the necessary harmonics.
Settings:
- Choose which waveform matches the tone you’re after.
- Set the Amp Envelope for that characteristic 808 attack and decay.
- Pitch Envelope modulation for adding impact to the start of the sound.
What you’re seeing in the video: • Triangle wave selection in Operator for harmonic richness • Envelope shaping to create the classic 808 decay • Real-time waveform analysis showing the synthesis process • Pitch envelope adjustments for a pitch-drop effect for for adding punch to the start of the sound.
Enhancing Your 808
Once you’ve crafted your base 808, distortion (subtle or extreme) will add character, grit, or harmonic complexity to make an 808 cut through dense mixes.
Ableton’s Roar device
Roar excels at adding controlled saturation and harmonic enhancement without destroying your 808’s fundamental low-end power. The key is finding the sweet spot between clean and processed.
What you’re seeing in the video: • Roar being applied to a clean 808 sample • Waveform display showing the impact on waveform-shape and overall volume • Various adjustments to shape the overall sound.
Advanced Roar Modulation
The real magic happens when you start modulating Roar’s parameters. This creates evolving 808s that maintain interest throughout your track whilst adding movement and dynamics.
What you’re seeing in the video: • Touch any parameter on Roar, then navigate to the Matrix section to apply an LFO or Env modulation to that parameter • In this example, we add a pulsing wobble effect.
The Science of Saturation and Harmonics
To understand the Bass Shaper section, we’re essentially turning sine waves into other (more harmonically-rich) waveforms.
Sine Wave: The simplest waveform. This is what the Drum Buss device adds to your drum loop or kick sample when you turn up the Boom dial. It sounds smooth and pure, and is ideal as a sub-bass.
Triangle Wave: Has more harmonics than a sine wave does. This is why triangle-wave-based 808s sound brighter than sine waves, while still retaining the same sub-bass character. Specifically, a triangle adds odd harmonics.
Square Waves: Just like a Triangle wave, it adds odd harmonics but more of them (ie: its a triangle wave plus additional, higher pitched, odd harmonics), creating an even brighter, perhaps aggressive, sound.
Science aside, each of these waveforms will have the same amount of “sub”, but a varying amount of “brightness”, “fuzz” or “grit”.
Genre-Specific 808 Applications
Trap 808s
- Try the Bass Shaper presets: “Doom Bass” or the rhythmic “Running Bass”
- Using Roar for that aggressive, saturated character
- Balancing with hi-hats and snares in busy arrangements
Drill 808s
- Try the “Soffit Rattler” preset for a drill-leaning character
- Creating 808 slides with pitch automation in Operator
- Working with faster tempos and tighter arrangements
Experimental Bass Music
- “Lazer Bass” and “Bot Bass” for synthetic textures
- Experiment with the LFO settings for modulation / evolving character
- Experiment with placing the 808 Maker (see below) after the Drum Rack or directly on its Kick Drum pad.
Pro Tips
Saving and Resampling
- Save your Operator 808 patches for quick recall
- We’ve added a Resample track so you can record the results as audio and save custom sounds to your library.
Mix Integration
EQ strategies when using processed 808s
- Watch for the harmonics clashing with your low mids
- We all love bass, but most speakers find lower than 22hz rude – so use EQ to roll off any unwanted sub frequencies.
- If your kick / bass wants to go lower than C-0 (32hz) – think about playing the octave up – the note will be the same, but it might balance better within the mix.
Managing low-end frequency conflicts
- As mixing generalisations go – don’t play a subby kick AND a subby bass note at the same time. Choose which one should have the sub, or only play the kick and bass at different times.
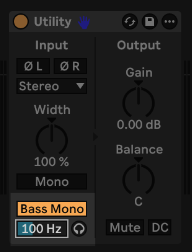
Stereo imaging considerations for 808s
- You can certainly mess around with the stereo width of 808s, and it can work really well, but for best-practice the lowest frequencies in the bass are typically set to mono.
The “808 Maker” pack
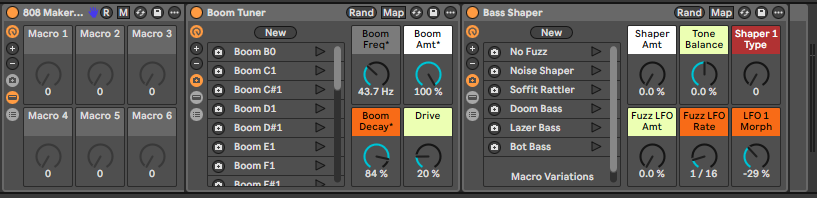
We made an audio effect rack (available here), using native Ableton devices, that can do the following:
- Add a sub-bass tone to any kick or drum loop
- Pitch the sub to any musical note (notice that specific notes resonate best on large speakers!)
- Add distortion so those bass notes can be heard on smaller speakers (laptops / phones, etc)
In this example, notice how weak the kick is before adding the 808 Maker:
Section 1: Boom Tuner – tunes the sub bass
This section uses the Boom feature of Drum Buss to transform any kick or drum loop into a sub bass. And the Boom list sets the pitch to specific musical notes:
Section 2: Bass Shaper – distortion presets
This adds the essential “fuzz” that makes your 808 kick or 808 bass cut-through on any speaker.
- Hit the Rnd button to come up with something random.
- Or use one of the preset snapshots:
- No Fuzz: Clean processing that lets the sub stay a sub
- Noise Shaper: Adds controlled digital character
- Soffit Rattler: Mid-range presence and grit
- Doom Bass: Heavy saturation for aggressive tracks
- Lazer Bass: Bright harmonic distortion
- Bot Bass: Robotic, synthetic character
808 Maker on a whole Drum Kit
Even if you drop the 808 Maker on a whole Drum Rack, the sub / bass will still only follow the kick pattern:
For a distorted bass sound, it will sound different depending on whether you drop the 808 Maker on the whole Drum Rack, or directly onto the Kick pad of the Drum Rack:
Make wild 808 sounds with the “808 YLDn8tr” rack
Included in the 808 Maker pack is the 808 YLDn8tr audio effect rack, which decimates anything you put through it:
Plus, there’s an automatic version where you just sit back and capture all the evolving wildness:
Easily capture all your 808s
All the Live Sets in the “808 Maker” pack have a Resampling track so you can capture what you’re hearing.
Simply hit record anywhere on the Resample track, like so:
…that example shows recording the whole kit with the YLDn8tr and 808 Maker applied, but the same method applies if you’re just resampling the kick/bass.
Ready to take your production skills to the next level? Our Produce Music course covers essential Ableton Live techniques and sound design concepts like the ones explored in this tutorial.
Related Resources
Dive into these blog categories: