
Originally published in 2017. Updated with expanded techniques, workflow refinements, and new production applications.
If you’ve been producing music for a while, chances are you’ve built up a large collection of drum loops, percussion grooves, textures, and musical phrases. But after enough projects, simply dragging loops into Arrangement View can start to feel repetitive and static.
Back in 2017, Liveschool trainer Adam Maggs began experimenting with a different approach: instead of destructively slicing loops into fixed arrangements, what if MIDI-controlled Gates could dynamically reveal different parts of multiple loops in real time? We first published the technique that year and have been teaching it in our Surry Hills studio ever since.
The result became a workflow we called Gate Remixing – sometimes now also referred to as gate slicing – a performance-oriented technique that uses MIDI-triggered Gates to recombine loops, trigger effects chains, and generate endless rhythmic variations inside Ableton Live.
In a hurry? Skip the setup and grab our free Gate Remixing template – all the routing pre-wired, ready to remix. Download it here. Works in Live Standard, no Suite required.
Unlike traditional audio chopping workflows, Gate Remixing keeps the original loops continuously playing underneath the surface. MIDI notes then selectively “open” different Gates, allowing fragments of different loops and effects chains to emerge dynamically. This makes the technique incredibly flexible for:
- Creating hybrid drum grooves
- Live remixing and improvisation
- Generating endless loop variations
- Building performance systems for Push or MIDI controllers
- Triggering effects chains rhythmically
- Creating evolving textures and melodic recombinations
Because it’s built on Simpler and the stock Gate device, the whole workflow runs in Ableton Live Standard – no Suite required.
Over the years we’ve continued evolving the workflow through live performance experimentation, downloadable templates, effects-rack variations, and newer performance systems. This guide combines the original concepts with expanded techniques and newer workflow ideas developed since the original release.
Watch the original Gate Remixing tutorial below:
How Gate Remixing Works
The core principle behind Gate Remixing is simple:
Instead of editing audio clips directly, MIDI notes trigger Gates that selectively allow different loops, sounds, or effects chains to pass through.
In this setup:
- A white noise sample acts as a control signal
- MIDI notes trigger the white noise
- The white noise opens Gates via sidechain inputs
- Each Gate controls a different loop or effects chain
- The MIDI clip becomes a live “remix score” controlling what is heard and when
This creates a system where grooves, textures, and effects can be recombined endlessly without destructively editing the original loops.
Sidechaining with the Gate device: How it works
The Gate is an effect that only allows audio signal to pass through if it is above the user-determined Threshold volume level. It can be used to eliminate low-level noise in an audio file, or cut the tails of notes and drum hits after the initial transient.
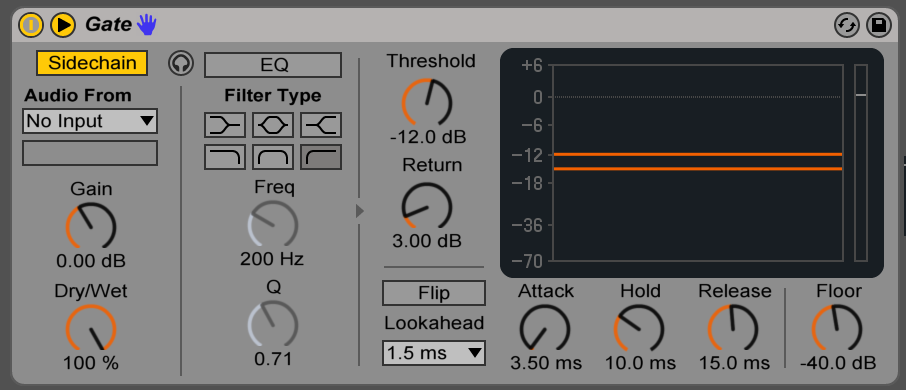
The  button expands the Gate device so that the sidechain parameter can be turned on. When enabled, the opening and closing of the gate is controlled by the volume of an audio input, rather than the audio from the channel itself.
Building the Core Gate Remixing System
In this technique, a Simpler instrument loaded with a sample of white noise functions as a control signal, opening and closing the gate via its sidechain audio input. With this routing, any MIDI notes on the Simpler channel will open the gate.
Here’s how to set this up in Arrangement View:
- Download a white noise sample.
- Drag White Noise.aif onto a MIDI channel to create a Simpler instrument.
- Drag a drum loop onto an audio channel, and place a Gate on this channel.
- Expand the Gate using the button and enable sidechain.
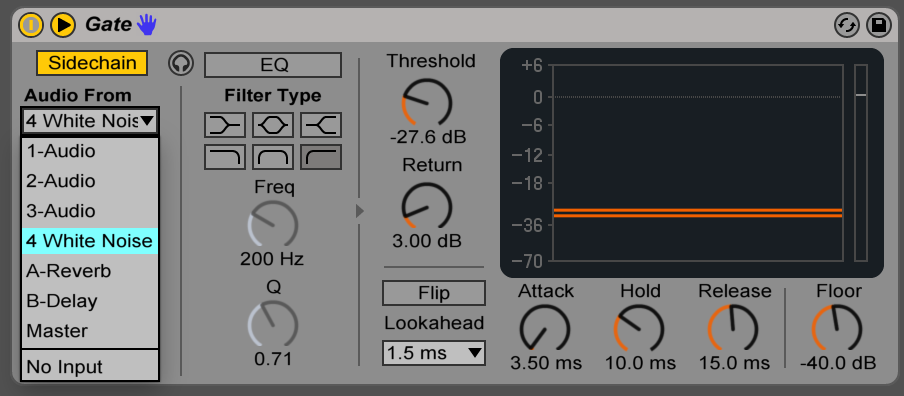
- Select the White Noise/Simpler channel from the drop down menu.
- Create a MIDI clip the same length as your drum loop, and enable your arrangement loop markers around the loop.
- Deactivate the Simpler channel by clicking the yellow box containing the channel number.
- While the clip is playing, experiment with adding notes to your Simpler MIDI clip. The Gate on the drum loop channel will open wherever there is a note.
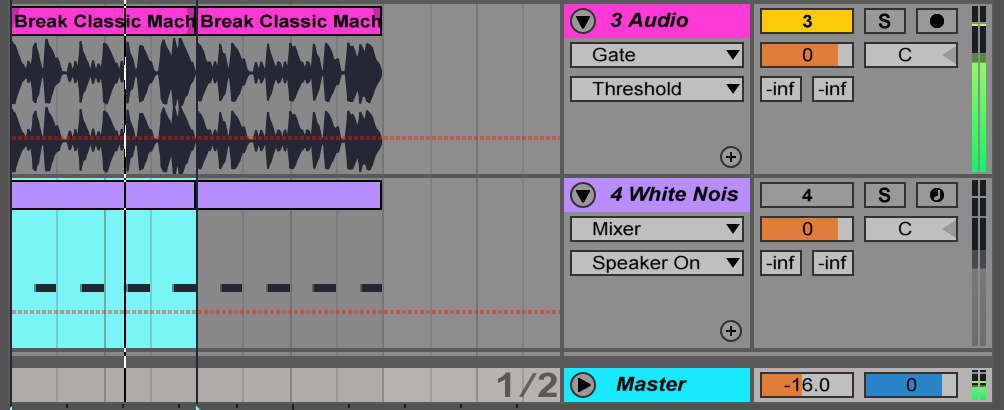
- Experiment with the Gate parameters, such as “hold” and “decay”. This will control how long the gate stays open after receiving a note.
- Turning the “floor” parameter all the way down to -inf will make sure loops are only heard when the gates receive a MIDI note.
That’s the core system running. If you’d rather skip the routing and get straight to jamming, our free Gate Remixing template has all of this pre-built – drop in your loops and go.
Extended Techniques
Dialling in the Groove
With a few different loops in the one project, it can help to apply the same groove settings to each clip so that they lock in together rhythmically.
- Drop your desired loops into Arrangement View.
- Pick one loop which will be your “master groove”. The groove in this instance refers to the timing and rhythmic feel of the clip.
- Right click on your elected loop and click “extract groove”. The loop’s name will now appear in the groove pool. Note: the shortcut to show/hide the groove pool is [ ⌘ + Opt + G ]
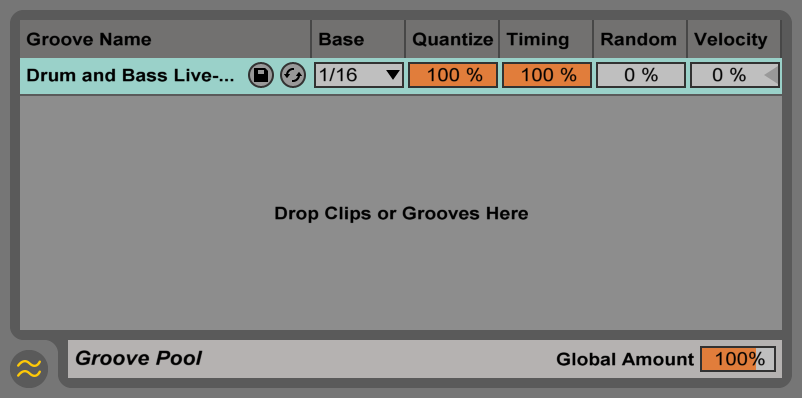
- Set both the “Quantise” parameter and “Timing” parameter to 100% as shown above.
- Shift-select your other drum loop clips, and select your drum groove from the “Groove” drop down menu in the clip box:
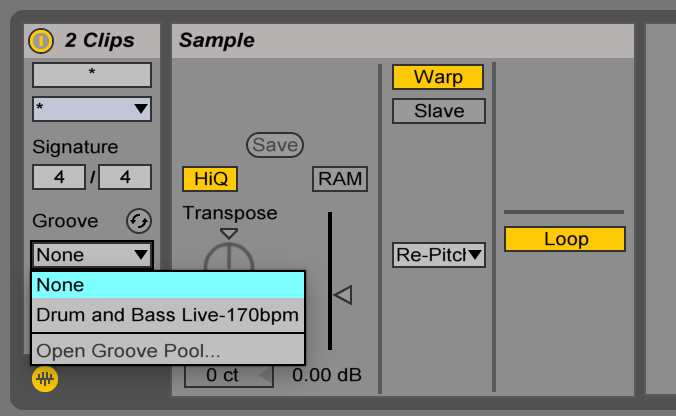
- Apply the same groove to any new MIDI trigger clip and your triggers and loops will all be tightly grooving together.
Expanding the System with Audio + MIDI Effects
Adding some more devices brings so much more possibility…
Audio effects
- Add any Audio Effect devices to the drum loop tracks. Depending on the effect, it could make a big difference if you add it either before or after the Gate devices – particularly for effects that have long tails, such as reverbs, delays, resonators, etc.
- Try applying the same method to effects on the Return tracks. For example, a Gate after a Reverb on a return track will create a “gated reverb” effect. Alternatively, place the reverb after the gate for a more natural reverb tail. To test the result, the most noticeable positions for the MIDI notes will likely be where the snares are.
MIDI Effects
- Adding MIDI Effect devices to the MIDI track will alter the pattern of MIDI triggers that the gates are sent.
- The Random device can be turned on/off to create random drum fills if you dial in high Chance and low Choices.
- The Note Length device can instantly make all triggers really short or long, determined by the Length parameter. For quantized results, toggle the Time button to switch to Sync mode.
Choked Drum Rack
Choke Groups are a feature of Drum Racks that allow you to set up “choking” interactions between samples in the rack. If any two samples are in the same choke group, then only one of those samples can play at any given time. This can result in a clean, tight sounding groove, because no notes can overlap.
Here’s how to set it up:
- Open the I/O panel of the Drum Rack to reveal a parameter on every chain called Choke.
- Select all the chains in the list and change the Choke from None to 1, to assign them all to Choke Group 1.
- Now, only one drum rack pad can play at any time. Try drawing some overlapping notes in your MIDI clip – you’ll hear that one drum loop will now cut the other off.
Gate Remixing for Effects Processing
Another application of this principle is to trigger many different effects chains on the one loop. This can create complex and unpredictable results quickly and easily.
- Create a drum rack with multiple instances of the white noise sample assigned to the pads. This will be the trigger channel. For this example we will use four triggers for four effects chains.
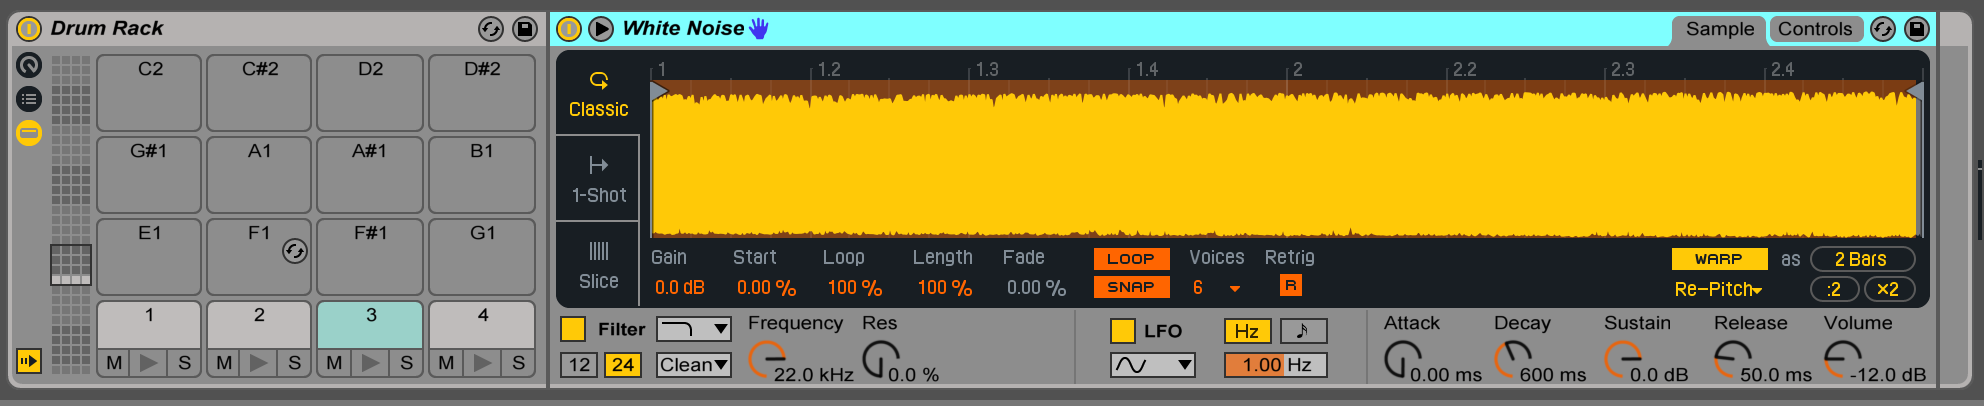
- In Session View, drop a drum loop clip on an audio channel. This is the channel that will be put through the effects chains.
- On the drum loop channel, create an Audio Effect Rack and drop a Gate into it. Turn the “floor” parameter all the way down. Duplicate this chain four times.
- Ensure the routing for each of the four Gates is from four separate triggers from the trigger channel. This will allow the effects to be toggled independent of each other. For the first Gate, select Audio From the first trigger in the Drum Rack. For the second chain, the second trigger and so on.
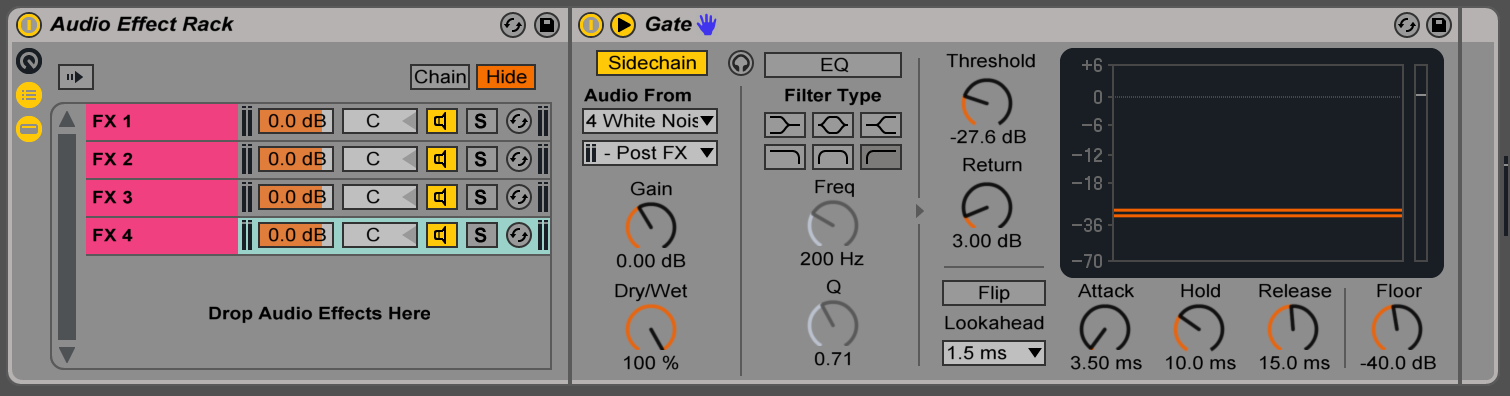
- On each chain, select different combinations of effects to trigger. Delays, resonators, and reverbs are a good place to start. So are distortions such as Overdrive, Amp, Redux, Dynamic Tube, or Saturator.
- Start the drum loop and a MIDI clip on your trigger channel. MIDI notes in the clip will open their corresponding Gate, triggering the effects chain for the duration of the note.
This is an idea that opens many possibilities. Using Push or another MIDI controller to control the trigger channel can make for a dynamic effects performance tool, and experimenting with different effects, altering MIDI patterns, and placing effects chains before and after the Gates can create limitless variations.
The Evolution of the Gate Remixing Workflow
What began as a simple experiment in recombining drum loops quickly evolved into a much broader performance and sound design workflow.
Since the original 2017 tutorial, we’ve continued developing Gate Remixing through:
- Live performance systems using Push and MIDI controllers
- Advanced effects-chain triggering setups
- Generative MIDI variation techniques
- Hybrid rhythmic and melodic recombination systems
- Performance template packs and downloadable project files
- Expanded workflows for modern versions of Ableton Live
One of the most powerful aspects of Gate Remixing is that it scales from simple loop experimentation all the way through to fully playable live performance systems.
Some producers use it as a quick way to create fresh drum variations from existing loops. Others build entire improvisational performance rigs where MIDI clips, probability devices, effects chains, and controller input dynamically reshape audio in real time.
Because the original loops remain continuously running beneath the system, the workflow stays flexible, non-destructive, and endlessly remixable.
Modern Generative Gate Remixing Systems
Since the original 2017 tutorial, we’ve continued expanding the Gate Remixing workflow into more advanced generative systems using newer Ableton Live features.
One direction this evolved toward was combining Gate Remixing with generative MIDI workflows and seeded randomisation systems. Instead of manually programming trigger patterns, MIDI generators can create endlessly varying rhythmic structures while still preserving musical coherence.
Because the Gate Remixing system separates trigger logic from the original audio loops, it becomes possible to generate highly unpredictable combinations while still maintaining groove, phrasing, and musicality.
The newer performance template below expands the original workflow into:
- Generative seed-based trigger creation
- Velocity-controlled loop blending
- Crossfading between loop layers
- Frequency-separated loop architecture
- Group-based effects processing
- Real-time improvisational remix systems
Watch the newer Gate Remixing template walkthrough below:
Download the Free Gate Remixing Template
Rather than build the routing from scratch every time, we’ve packaged the whole system into a ready-to-play Ableton Live template – and it’s completely free. Load it up, drop in your loops, and start remixing immediately. It’s built on Simpler and the stock Gate device, so it works in Live Standard – no Suite required, and it’s yours to use royalty free in your own music and performances.
Every template is built around four core parts:
- The Trigger Track – play or program MIDI patterns in here to remix the Sounds in real time.
- The Sounds (group) Track – holds all the loops that get remixed by your Trigger Track.
- The Resampling Track – hit record here to capture your jamming as a fresh audio file.
- Audio Effect Return Tracks – use the sends on the Sounds tracks to bring in gated, performable effects.
Download the free Gate Remixing template here.
Learning to build tools like this from the ground up is exactly what we do in person in Sydney. Our Produce Music program takes you from first ideas to finished tracks with one-on-one mentoring.
Examples in Action
Here’s the template in action with a few different loop packs, each demonstrating the workflow across a different style. Each pack is loaded and ready to remix:
Lo Fi House Drums – Loop Pack
Get the pack here: Lo Fi House Drums Pack – by Anthony Fade
Breakbeat Techno Drums – Loop Pack
Get the pack here: Breakbeat Generator Pack. There’s a full write-up in our Breakbeat Generator post too.
Acid House Synth – Loop Pack
Get the pack here: Acid House 303 Synth Pack
Experiment with:
- Melodic loops and tonal textures
- Probability-based MIDI triggering
- Follow Actions and generative clips
- Drum Rack choke groups
- Effects before vs after Gates
- Push performance workflows
- Randomised MIDI Effects
- Hybrid audio/MIDI live remix systems
The deeper you explore it, the more Gate Remixing becomes less of a single trick – and more of a creative framework for building evolving musical systems inside Ableton Live.
More Tips + Tricks tutorials
This technique is one of the workflow skills we teach as part of the wider craft of music production. For the bigger picture, see our Workflow in Ableton guide.
Subscribe to our email newsletter for all tutorials
Subscribe to our YouTube channel for video tutorials
Check out the Music Courses we run